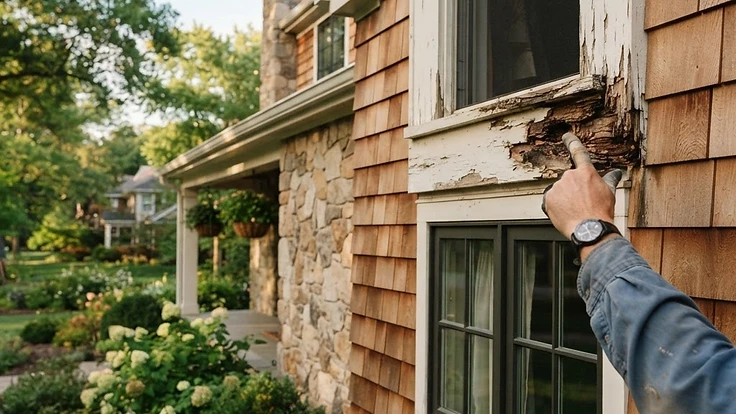
Why Your Exterior Wood Trim Is Rotting (And How to Stop It Before It Spreads)
Soft, discolored wood trim around windows and doors signals rot — here's how to find it, stop it, and repair it before it spreads.
The Soft Spot You Shouldn't Ignore
If you press a screwdriver into your window trim or porch post and it sinks in with almost no resistance, you've found wood rot. It's one of the most common exterior problems homeowners overlook because it starts small — a little paint bubbling, a slightly discolored patch — and looks purely cosmetic. It isn't. Rot is a fungal infection that feeds on wood fiber, and once it starts, it keeps spreading as long as moisture is present. Left alone, a $20 trim board repair can turn into a $2,000 siding and framing replacement.
Here's how to catch it early, figure out how bad it actually is, and fix it the right way.
Why Trim Rots in the First Place
Exterior wood trim — around windows, doors, roof eaves, and porch posts — is constantly exposed to rain, sun, and temperature swings. Paint and caulk are the only things standing between that wood and moisture. When either fails, water gets in, and wood rot needs just three things to thrive: moisture, oxygen, and a food source (the wood itself).
The most common entry points are:
- Cracked or missing caulk where trim meets siding or window frames
- Peeling or chalky paint that no longer sheds water
- Poor flashing above windows and doors, letting water run behind the trim instead of off of it
- Ground contact, especially on porch posts or bottom door trim, where wood sits too close to soil or concrete that stays damp
- Clogged gutters that overflow and repeatedly soak the fascia and trim below
Notice the pattern: it's almost always about water finding a way in and having nowhere to go.
How to Diagnose Rot (Not Just Guess)
Don't rely on looks alone — surface paint can hide serious damage underneath. Use this quick test on any trim that looks suspicious:
- Press test: Push a flathead screwdriver or an awl into the wood at a slight angle. Healthy wood resists; rotted wood gives way easily or feels spongy.
- Probe the edges: Rot spreads outward from the original leak point, so test a few inches in every direction from the visible damage to find the true size of the problem.
- Check for moisture source: Look above and around the damaged area for the cause — cracked caulk, a gap in flashing, a nearby downspout issue. If you don't fix the source, the repair won't last.
- Tap test: A dull, hollow sound when you tap the wood (compared to a solid knock on healthy trim) often means rot has traveled further than it appears on the surface.
If the screwdriver sinks in more than half an inch, or the soft area is larger than your palm, you're likely looking at a repair that goes beyond a simple patch — the board may need to be partially or fully replaced.
Fixing Minor to Moderate Rot Yourself
For localized rot — a soft patch on a window sill or the bottom of a door jamb — epoxy wood repair is a durable, weatherproof fix that most homeowners can do in an afternoon.
What you'll need: a wood-hardening consolidant, two-part epoxy wood filler, a putty knife, sandpaper (80 and 120 grit), exterior primer, and paint.
Steps:
- Remove loose material. Dig out all soft, crumbling wood with a screwdriver or chisel until you reach solid wood. Don't be shy — any rot left behind will keep spreading under the repair.
- Let it dry fully. Rot needs moisture to survive, so the area must be completely dry before you seal it in. Give it at least 24–48 hours of dry weather, or speed things up with a heat gun on a low setting (carefully).
- Apply a wood hardener/consolidant. Brush it into the remaining exposed wood fibers. This soaks in and reinforces any slightly softened wood around the repair area, giving the filler something solid to bond to.
- Fill with two-part epoxy wood filler. Mix only what you'll use in the next few minutes — it sets fast. Pack it into the cavity slightly above the surrounding surface, since it shrinks a bit as it cures.
- Sand and shape. Once fully cured (usually 24 hours), sand it flush and smooth with the surrounding wood profile.
- Prime and paint. Use an exterior-grade primer followed by paint that matches your trim. This step isn't optional — unpainted epoxy repairs will still fail under UV exposure.
- Fix the moisture source. Re-caulk gaps, correct flashing, or clear gutters so the same spot doesn't rot again in a year.
When It's Time to Replace, Not Repair
Epoxy repairs work well for shallow or localized damage, but they're not a substitute for structural wood. If an entire board has gone soft, if rot has reached framing members behind the trim, or if you can see daylight or insect activity (carpenter ants love rotted wood) inside the cavity, it's time to cut out and replace the section with new, properly primed lumber — ideally one rated for exterior use, like cedar or pressure-treated wood. Trying to epoxy-patch a structurally compromised board is a short-term fix that will fail and cost more down the line.
A Few Minutes a Year Saves Thousands
The best defense against wood rot is a quick walk-around twice a year — once in spring, once in fall — checking caulk lines, paint condition, and any trim near grade or gutters. Catching a soft spot early means a small epoxy repair instead of tearing into siding and framing later.
This article is general information and not legal, financial, or medical advice.
Keeping track of which trim boards you've checked, repaired, or need to watch can easily slip through the cracks when you're juggling a dozen other home tasks. Start your free HomeNostics trial to log maintenance checks like this one and get reminders before small problems turn into expensive ones.